お仕事でLinux環境でHAクラスタを検証する必要が出てきたので、手順を調べてみました。
RHEL 6.4環境で検証しております:
1
2
| # cat /etc/redhat-release
Red Hat Enterprise Linux Server release 6.4 (Santiago)
|
当然ながらCentOS6でも動作するかと思います。RHEL 7 or CentOS7ではOSの仕組みが変わっていると思いますので、ここでまとめた手順の通りにしてもおそらく動作しません。
以下のような環境を構築します:
| # | Hostname | IP Address | Remarks |
|---|
| 1 | rhel-act | 192.168.56.31 | Active server |
| 2 | rhel-sta | 192.168.56.32 | Standby server |
| 3 | rhel-logical | 192.168.56.30 | Logical hostname / floating IP |
| 4 | rhel-iscsi | 192.168.56.40 | iScsi server |
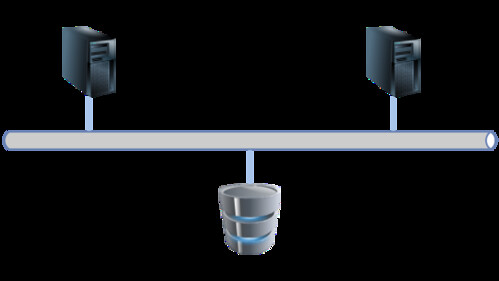
簡単なネットワーク図はこちら:
事前準備をまとめてみます。
稼動系と待機系でホスト名を変更すると思いますので、メモとして書いておきます:
 1
 2
 3
 4
 5
 6
 7
 8
 9
10
11
| # YYYYMMDD=`date "+%Y%m%d"`
# cd /etc/sysconfig
# cp -p network network.${YYYYMMDD}
# vi network
# diff -u network.${YYYYMMDD} network
--- network.20160625 2016-06-25 10:02:48.472999973 +0800
+++ network 2016-06-25 15:05:22.301995842 +0800
@@ -1,2 +1,2 @@
NETWORKING=yes
-HOSTNAME=rhel-dev
+HOSTNAME=rhel-act
|
静的IPアドレスを割り当ててあげます。
 1
 2
 3
 4
 5
 6
 7
 8
 9
10
11
12
13
14
15
16
17
18
19
20
21
| # cd /etc/sysconfig/network-scripts/
# cp -p ifcfg-eth0 ifcfg-eth0.${YYYYMMDD}
# vi ifcfg-eth0
# diff -u ifcfg-eth0.${YYYYMMDD} ifcfg-eth0
--- ifcfg-eth0.20160625 2016-06-25 10:02:48.472999973 +0800
+++ ifcfg-eth0 2016-06-25 15:09:10.943999953 +0800
@@ -1,9 +1,11 @@
DEVICE="eth0"
-BOOTPROTO="dhcp"
-DHCP_HOSTNAME="rhel-dev"
+BOOTPROTO="static"
+DHCP_HOSTNAME="rhel-act"
HWADDR="08:00:27:3F:4C:85"
-IPV6INIT="yes"
+IPV6INIT="no"
NM_CONTROLLED="yes"
ONBOOT="yes"
TYPE="Ethernet"
UUID="a9e827e5-fbec-44a9-ba1e-d6ceec3a2278"
+IPADDR="192.168.59.31"
+NETMASK="255.255.255.0"
|
SELinuxはオフになっていることを確認します:
1
2
| # getenforce
Disabled
|
オフになっていない場合は、オフにします。SELinuxを無効化する| セキュリティ | [Smart]を参照してください。
ファイアーウォールはオフになっていることを確認します:
1
2
3
4
5
6
7
8
9
| # iptables -L -n
Chain INPUT (policy ACCEPT)
target prot opt source destination
Chain FORWARD (policy ACCEPT)
target prot opt source destination
Chain OUTPUT (policy ACCEPT)
target prot opt source destination
|
ルールが有る場合には、iptables -Fします。
Redhat Subscriptionに登録していないため、CentOSのリポジトリを使います。以下のようにして、/etc/yum.repos.d/centos.repoを追加します:
 1
 2
 3
 4
 5
 6
 7
 8
 9
10
11
12
13
14
15
16
17
18
19
20
21
22
| # cd /etc/yum.repos.d/
# cat centos.repo
[base]
name=CentOS- - Base
mirrorlist=http://mirrorlist.centos.org/?release=6&arch=$basearch&repo=os
#baseurl=http://mirror.centos.org/centos//os//
gpgcheck=1
gpgkey=http://mirror.centos.org/centos/RPM-GPG-KEY-CentOS-6
[updates]
name=CentOS- - Updates
mirrorlist=http://mirrorlist.centos.org/?release=6&arch=$basearch&repo=updates
#baseurl=http://mirror.centos.org/centos//updates//
gpgcheck=1
gpgkey=http://mirror.centos.org/centos/RPM-GPG-KEY-CentOS-6
[extras]
name=CentOS- - Extras
mirrorlist=http://mirrorlist.centos.org/?release=6&arch=$basearch&repo=extras
#baseurl=http://mirror.centos.org/centos//extras//
gpgcheck=1
gpgkey=http://mirror.centos.org/centos/RPM-GPG-KEY-CentOS-6
|
/etc/hostsファイルを編集します。今回は、
- rhel-act: 稼動系サーバ
- rhel-sta: 待機系サーバ
- rhel-iscsi: iscsiターゲットサーバ
- rhel-logical: 論理ホスト名
として扱っています。
 1
 2
 3
 4
 5
 6
 7
 8
 9
10
11
12
13
14
15
16
17
18
19
20
21
22
23
| # cd /etc/
# ll hosts*
-rw-r--r--. 1 root root 158 1月 12 21:28 2010 hosts
-rw-r--r--. 1 root root 370 1月 12 21:28 2010 hosts.allow
-rw-r--r--. 1 root root 460 1月 12 21:28 2010 hosts.deny
# cp -p hosts hosts.${YYYYMMDD}
# ll hosts*
-rw-r--r--. 1 root root 158 1月 12 21:28 2010 hosts
-rw-r--r-- 1 root root 158 1月 12 21:28 2010 hosts.20160625
-rw-r--r--. 1 root root 370 1月 12 21:28 2010 hosts.allow
-rw-r--r--. 1 root root 460 1月 12 21:28 2010 hosts.deny
# vi hosts
# diff -u hosts.${YYYYMMDD} hosts
--- hosts.20160625 2010-01-12 21:28:22.000000000 +0800
+++ hosts 2016-06-25 15:20:31.274997882 +0800
@@ -1,2 +1,6 @@
127.0.0.1 localhost localhost.localdomain localhost4 localhost4.localdomain4
::1 localhost localhost.localdomain localhost6 localhost6.localdomain6
+
+192.168.59.31 rhel-act
+192.168.59.32 rhel-sta
+192.168.59.35 rhel-iscsi
+192.168.59.30 rhel-logical
|
とりあえず今日はここまで。